
Publishing to Cloudflare
each site as a Worker in your account.
Kiln can deploy any site to your own Cloudflare account. Each site becomes a Cloudflare Worker that serves the site's files from Cloudflare's network. You need no Wrangler, no Git repository and no build step.
01Overview
The account is operator-wide: every workspace whose plan allows it deploys to the same Cloudflare account, the one you set in the console.
02What you need
- A Cloudflare account (the free plan works; see Costs for its limits).
- A workers.dev subdomain on that account.
- An API token and the account id.
- For custom domains: the domain added to the same Cloudflare account as a zone.
Sites are deployed to your own Cloudflare account. The free plan has limits, for example on the number of Workers per account and on requests that run Worker code; Kiln creates one Worker per published site. Above the free limits you pay Cloudflare. See Costs.
03Step 1: set up the workers.dev subdomain
A new Cloudflare account has no workers.dev subdomain until you choose one. Without it every deploy fails.
- Cloudflare dashboard → Workers & Pages.
- If you are asked to set up a subdomain, choose a name (for example
your-agency). Your sites will then be athttps://<worker name>.your-agency.workers.dev. - If you already created a Worker before, the subdomain exists: you see it on the Workers & Pages overview.
04Step 2: create the API token
- Cloudflare dashboard → My Profile → API Tokens → Create Token → Create Custom Token.
- Give it a name, e.g. "Kiln publishing".
- Add these permissions:
Scope Permission Access Account Workers Scripts Edit Zone Workers Routes Edit Zone Zone Read - Under Account Resources, include your account. Under Zone Resources, include the zones you will use for client domains (or all zones of the account).
- Create the token and copy it. Cloudflare shows it only once.
05Step 3: find the account id
Cloudflare dashboard → Workers & Pages → in the right-hand column, Account details → Account ID. It is 32 characters of letters a–f and digits.
06Step 4: enter both in the console
- Console → Hosting → Cloudflare account id: paste the account id and save. Do this first; the token test needs it.
- Console → Integrations → Cloudflare API token: paste the token, save, then click Test. A working setup answers
token accepted, workers.dev subdomain <your subdomain>. - Optional: Hosting → Worker name prefix (default
site). Each site becomes a Worker named<prefix>-<site address>, for examplesite-bakery. Use a prefix if the account also holds other Workers.
The status check Cloudflare publishing is ready turns green when both values are set and the token works. You can also set the token with CLOUDFLARE_API_TOKEN in .env.
07Step 5: allow it in a plan
Console → Plans → edit a plan → turn on Cloudflare publishing. A workspace on a plan without it sees "Not in the <plan> plan" in the publish dialog.
08Step 6: deploy a site
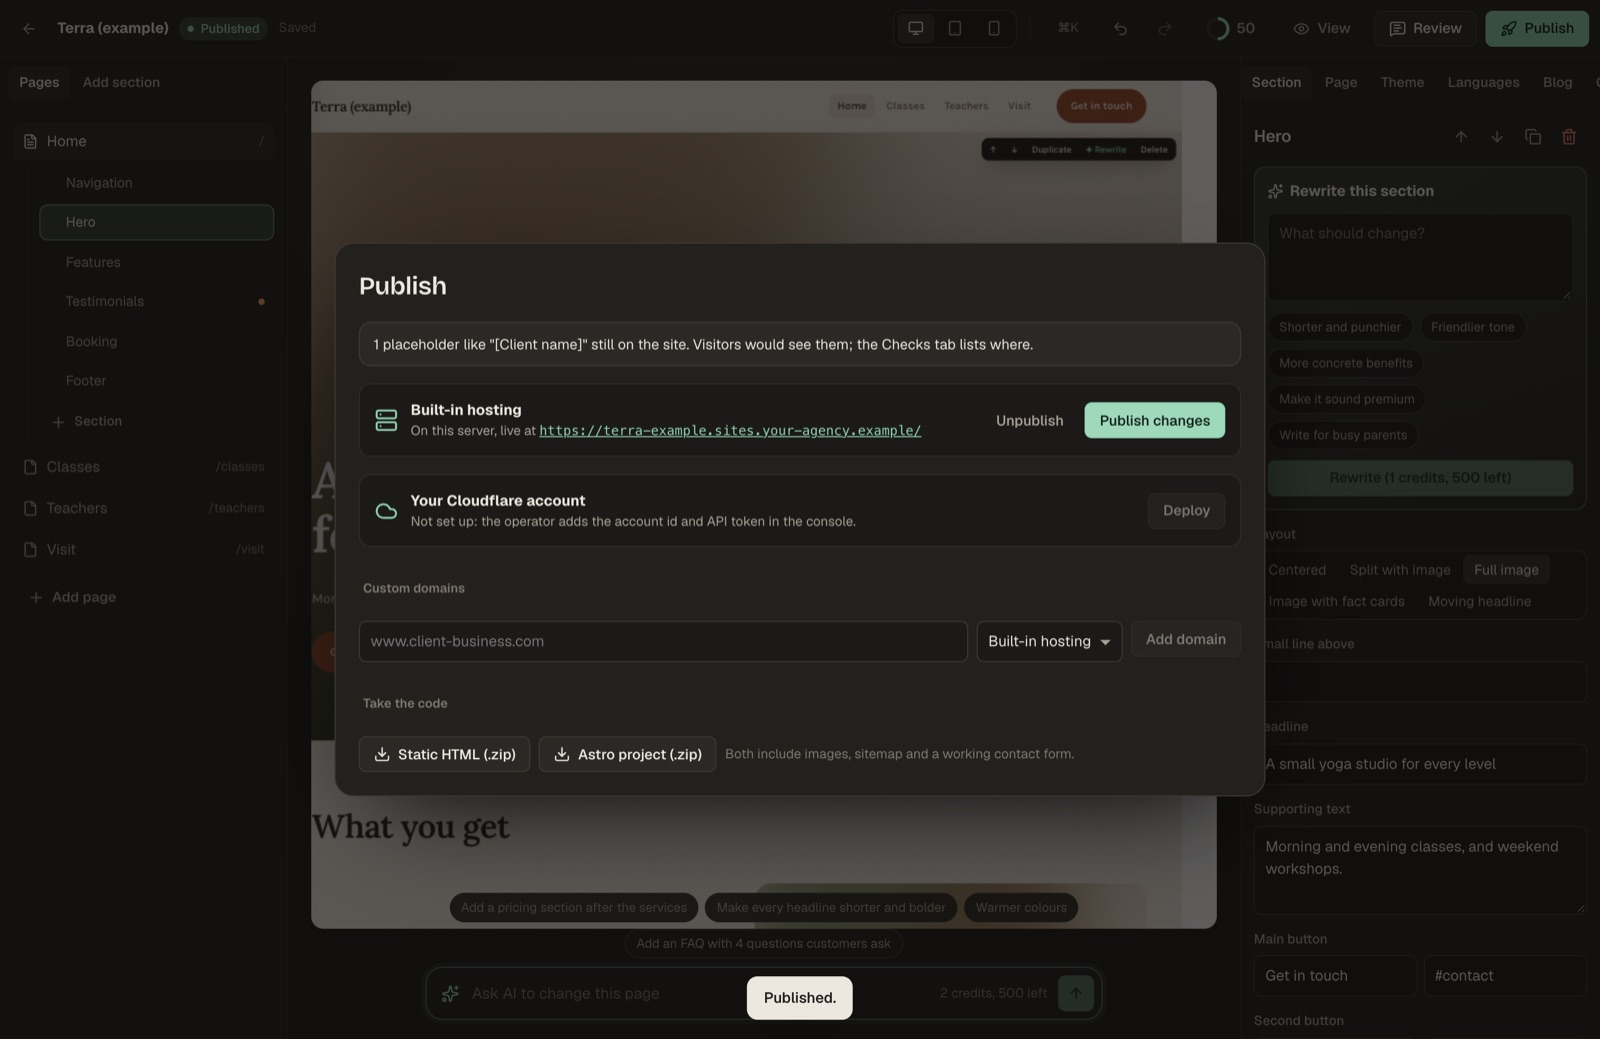
In the builder, open the site → Publish → Your Cloudflare account → Deploy. When it finishes, the dialog shows the workers.dev address, and a message like "Published to Cloudflare (12 of 12 files uploaded)". Later deploys are labelled Deploy again and replace the previous version.
09What happens technically
Kiln follows Cloudflare's documented direct upload for Workers static assets:
- It renders every page in every language to HTML, plus one stylesheet and one small script in an
assetsfolder,sitemap.xml,robots.txt,404.htmland every image the site uses. - It sends Cloudflare the list of files with a hash of each. Cloudflare answers which files it does not have yet, and only those are uploaded. That is why a second deploy often uploads fewer files.
- It uploads a tiny Worker script that only serves those files, with these settings:
html_handling: auto-trailing-slash:/aboutand/about/both open theindex.htmlfile in the site'saboutfolder.not_found_handling: 404-page: unknown addresses show the site's own404.html.
- It turns on the Worker's workers.dev address and reads your account's subdomain to build the URL.
The deployed site is static. Nothing on Cloudflare calls back to your server except the contact form.
A Cloudflare deploy does not publish the site on the built-in hosting; the two are independent.
10Custom domains on Cloudflare
- Add the client's domain to your Cloudflare account (Cloudflare → Add a domain) and change its name servers as Cloudflare asks. The zone must be in the same account as the account id in the console.
- Deploy the site to Cloudflare at least once.
- In the builder: Publish → Custom domains → enter the host name (e.g.
www.bakery.example), choose Cloudflare, Add domain. The site's plan must allow custom domains, and you must be a workspace owner. - Kiln attaches the host name to the Worker. Cloudflare creates the DNS record and issues the certificate, which usually takes a few minutes.
- Click Deploy again so the site's canonical links, sitemap and share tags use the new domain.
If the domain is not in the account, you get: "No zone for <domain> in this Cloudflare account. Add the domain to Cloudflare first."
11Forms on Cloudflare sites
The contact form on a Cloudflare site posts to your Kiln server (<public URL>/f/<site id>). Keep the Kiln server running and the public URL set; messages arrive in the site's Forms tab as usual.
12Taking a site off Cloudflare
Unpublish in the builder only takes the site off the built-in hosting. To remove a Cloudflare deployment, delete the Worker in the Cloudflare dashboard (Workers & Pages → the Worker → Settings → Delete).
13Errors
Cloudflare's own error text is shown in the dialog, prefixed with Cloudflare:. Common causes are in Troubleshooting.